Create a Serverless Webapp on AWS: Contact Form
Introduction
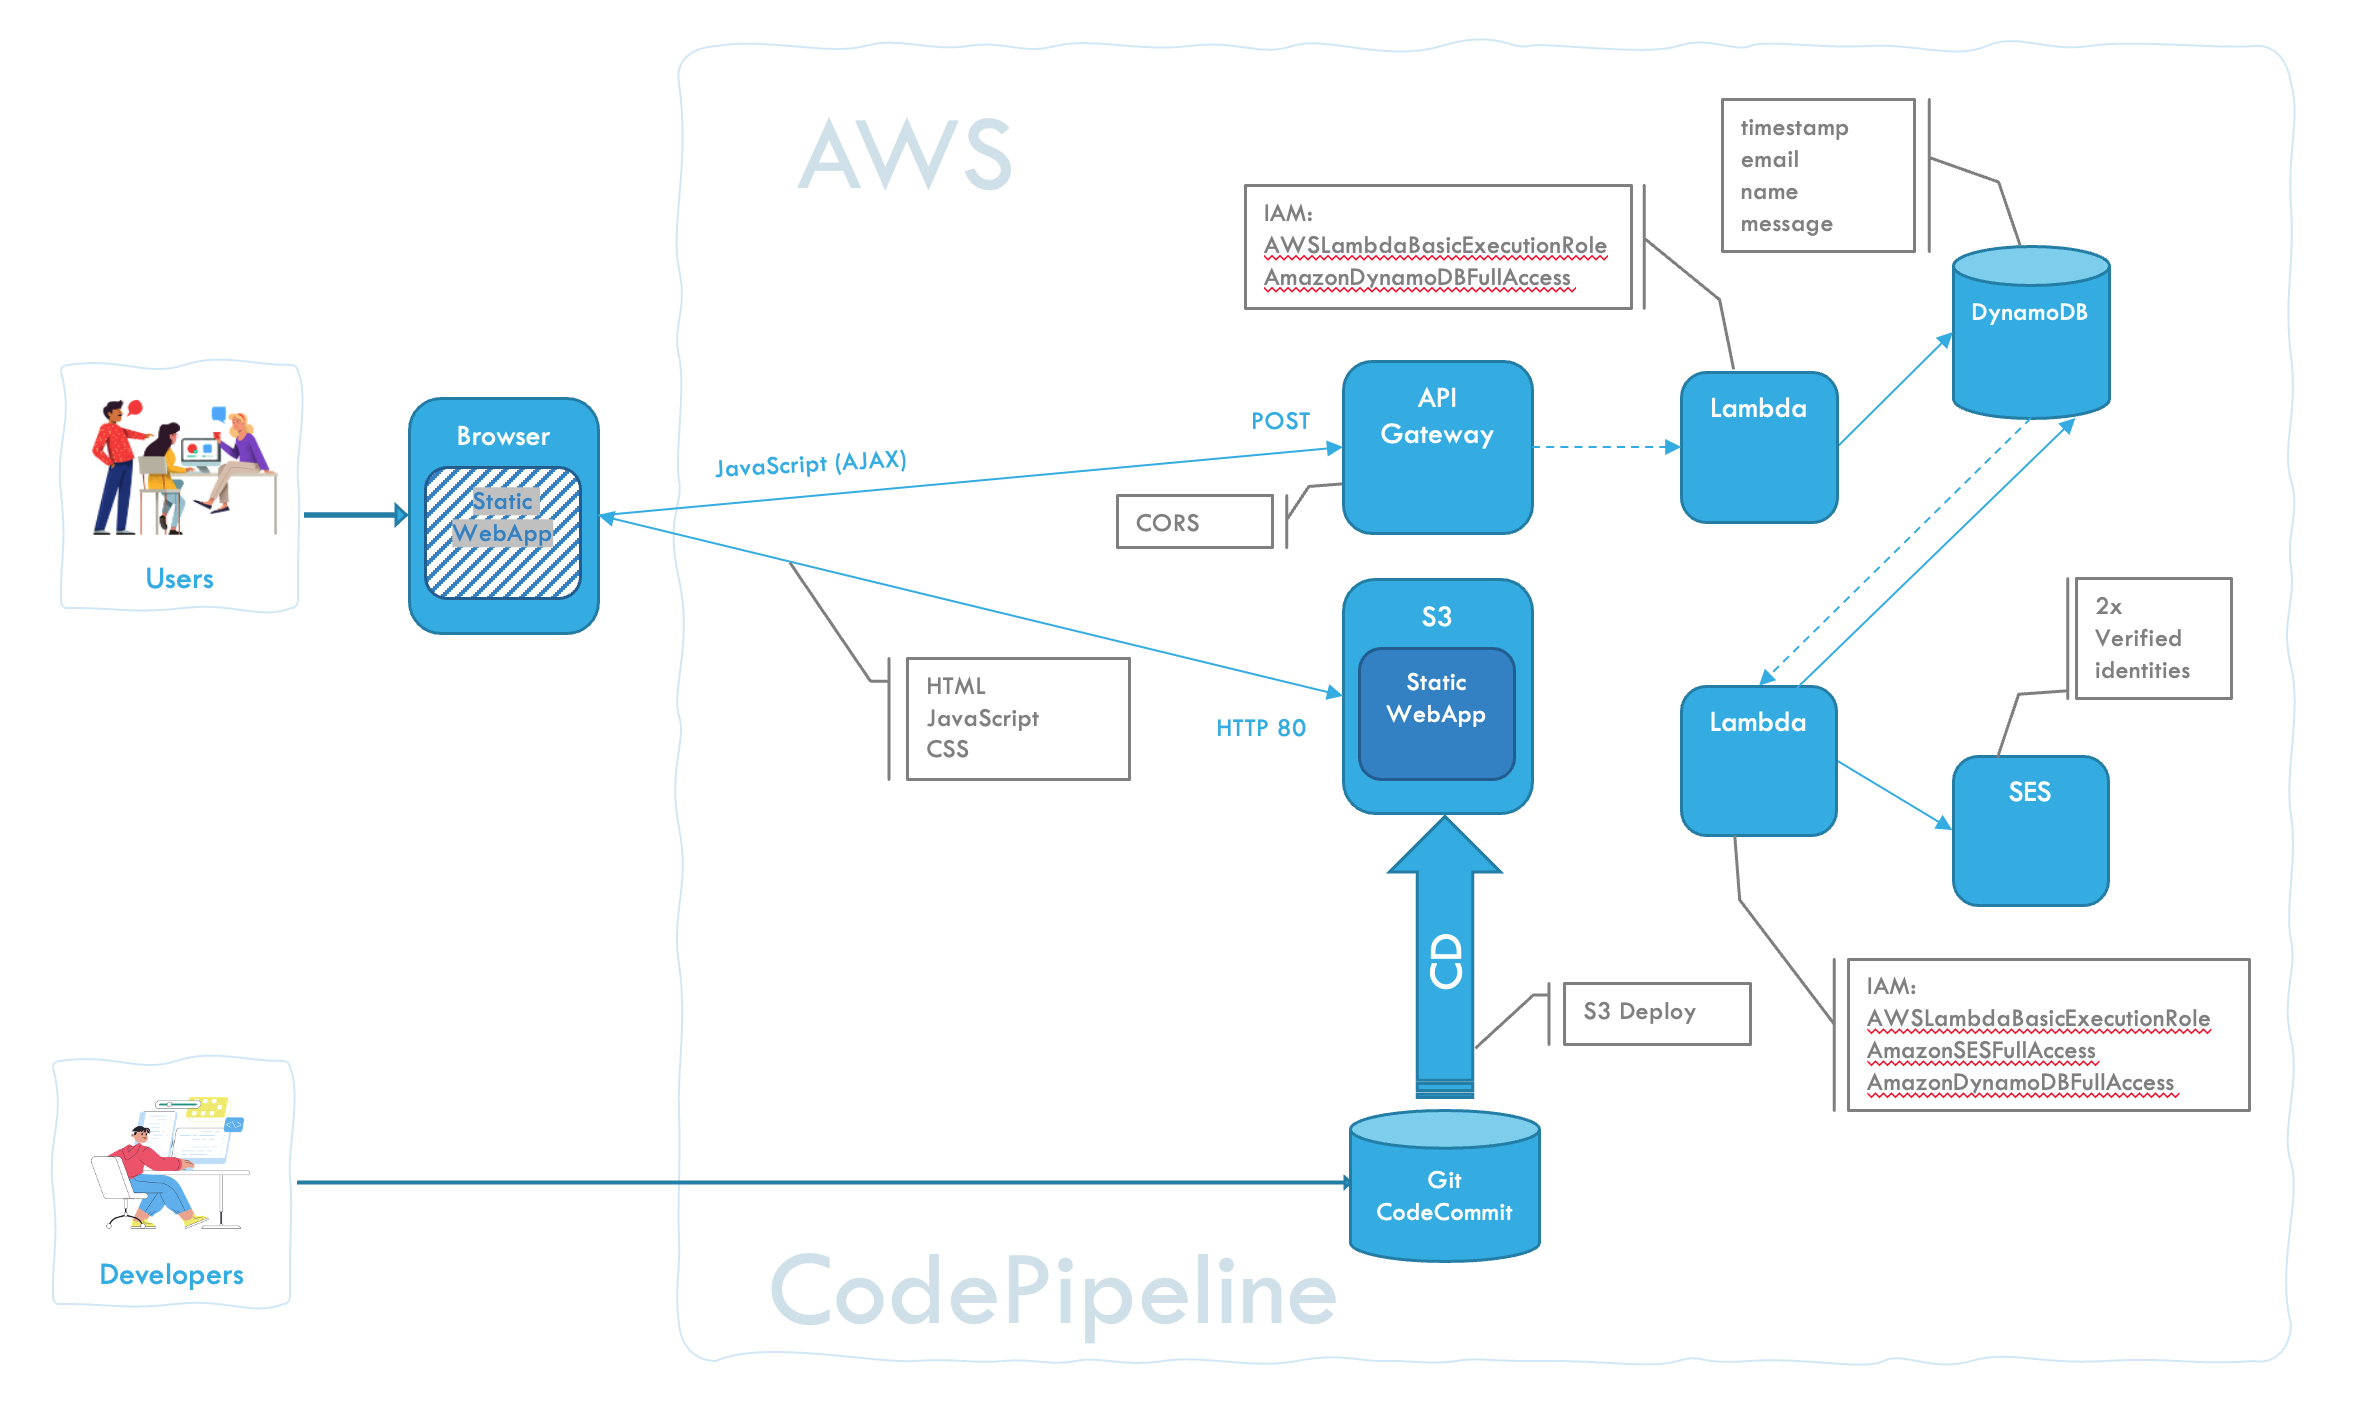
This tutorial guides you through creating a serverless web application with a contact form on AWS. The application uses AWS S3 for hosting the front-end, AWS Lambda and API Gateway for backend processing and DynamoDB to store information. When contact information is entered in the form it will be saved in DynamoDB and an email is sent, using SES, as a notification. We’ll walk through each step, ensuring you verify the functionality at each stage.
Method
- Develop a simple web page.
- Set up S3 for static website hosting.
- Create Lambda functions for DynamoDB and SES.
- Create API Gateway.
- Develop the web page
- Add a DynamoDB table.
- Configure SES
Prerequisites
- An AWS account. If you don’t have one, sign up here.
- Basic familiarity with the AWS Management Console, AWS CLI, Python, HTML, and JavaScript.
Overview
Step 1: Add a DynamoDB Table For Contacts
- Create a DynamoDB Table
- Navigate to the DynamoDB service and click on “Create Table”
- Table name:
Contacts - Primary key:
timestamp - Click on “Create Table”
- Table name:
- Navigate to the DynamoDB service and click on “Create Table”
Step 2: Configure SES (Amazon Simple Email Service)
In order to send and receive emails for this tutorial you need to register two identities (email addresses) and validate these
Create Identity
- Navigate to SES and select Identities in the left manu.
- Press Create identity
- Choose Email address
- Enter a valid email address
- Press Create identity
- Repeat the above steps for the second email address
Confirm the email addresses
- You will receive emails wth a confirmation link
- Follow the link to confirm the email addresses
Step 3: Create Lambda Functions
We will need two lambda functions. One that writes the contact information to the DynamoDB and a second one that sends a notification email, via SES, when the DynamoDB is updated with new information.
Create an IAM role that grants the lambda function access to DynamoDB
- Navigate to the IAM service in the AWS Management Console.
- Choose Roles in the left manu
- Click Create role
- Select AWS service
- Service or use case: Lambda
- Press Next
- Check: AWSLambdaBasicExecutionRole
- Check: AmazonDynamoDBFullAccess
- Press Next
- Role name:
LambdaRoleToAccessDynamoDB - Press Create role
Create a Lambda Function that writes a record to the DynamoDB
Navigate to the Lambda service in the AWS Management Console.
Click “Create function” and choose “Author from scratch”.
- Function name:
AddContactInfo - Runtime: Python
- Expand Change default execution role and choose Use an existing role
- Existing role: LambdRoleToAccessDynamoDB
- Press Create function
- Function name:
Change the Python code for your Lambda function to this:
lambda_function.pyimport json # used for converting json strings to Python objects import boto3 # handles AWS from datetime import datetime # used for creating the timestamp def lambda_handler(event, context): # Connect to the DynamoDB table db = boto3.resource('dynamodb') table = db.Table('Contacts') # Create the time stamp dateTime = (datetime.now()).strftime("%Y-%m-%d %H:%M:%S") try: # Get the contact info from the request payload = json.loads(event['body']) # Add a row with contact info to DynamoDB table.put_item( Item={ 'timestamp': dateTime, 'name': payload['name'], 'email': payload['email'], 'message': payload['msg'] } ) # Return success return { 'statusCode': 200, 'body': json.dumps('Successfully saved contact info!'), 'headers': { "Access-Control-Allow-Origin": "*", "Access-Control-Allow-Credentials": True, } } except: # Return error return { 'statusCode': 400, 'body': json.dumps('Error saving contact info'), 'headers': { "Access-Control-Allow-Origin": "*", "Access-Control-Allow-Credentials": True, } }Press Deploy
Verify
- Use the “Test” feature in the Lambda console to ensure it returns the correct response.
Press “Test”
Test event action: Create new event
Event name:
AddContactInfoToDynamoDBEvent JSON
{
	"httpMethod": "POST",
	"body": "{\"name\": \"Darth\", \"email\": \"darth.vader@email.com\", \"msg\": \"I am your ...\"}"
}
Press “Save”
Press “Test” (again)
Verify the response
Response
{
"statusCode": 200,
"body": "\"Successfully saved contact info!\""
}
Verify that there is a new record in the DynamoDB table
- Use the “Test” feature in the Lambda console to ensure it returns the correct response.
Create an API Gateway
- Press “+ Add trigger” in the Function Overview Diagram
- Choose the API Gateway service.
- Create a new REST API.
- Security: Open
- Press “Add”
Enable CORS
Navigate to the API Gateway -> Resources (/AddContactInfo)
- Click on “Enable CORS”
- Press “Save”
Make sure CORS is also added to the response headers in the lambda function
Verify
- Navigate to the API Gateway service and select the newly created API
- Go to the Test tab
Method type: POST
Request body:
{
	"name": "Yoda",
	"email": "yoda@email.com",
	"msg": "The greatest teacher, failure is."
}
- Go to the Test tab
- Navigate to the API Gateway service and select the newly created API
Create an IAM role that grants the lambda function access to SES
- Navigate to the IAM service in the AWS Management Console.
- Choose Roles in the left manu
- Click Create role
- Select AWS service
- Service or use case: Lambda
- Press Next
- Check: AWSLambdaBasicExecutionRole
- Check: AmazonSESFullAccess
- Check: AmazonDynamoDBFullAccess
- Press Next
- Role name: LambdaRoleToAccessSES
- Press Create role
Create a Lambda Function that Sends an Email notification
Navigate to the Lambda service in the AWS Management Console.
Click “Create function” and choose “Author from scratch”.
- Function name:
SendContactInfoEmail - Runtime: Python
- Expand Change default execution role and choose Use an existing role
- Existing role: LambdaRoleToAccessSES
- Press Create function
- Function name:
Change the Python code for your Lambda function to this:
lambda_function.pyimport json import boto3 # Initialize the DynamoDB client dynamodb = boto3.resource('dynamodb') table = dynamodb.Table('Contacts') # Replace with your DynamoDB table name def lambda_handler(event, context): # Scan the DynamoDB table result = table.scan() items = result['Items'] ses = boto3.client('ses') body = f""" Contact Information: {items} """ ses.send_email( Source = '<FROM_EMAIL>', Destination = { 'ToAddresses': [ '<TO_EMAIL>' ] }, Message = { 'Subject': { 'Data': 'Contact Info Notification', 'Charset': 'UTF-8' }, 'Body': { 'Text':{ 'Data': body, 'Charset': 'UTF-8' } } } ) return { 'statusCode': 200, 'body': json.dumps('Successfully sent email from Lambda using Amazon SES') }Press Deploy
Verify
- Use the “Test” feature in the Lambda console to ensure it returns the correct response.
Press “Test”
- Test event action: Create new event
- Event name:
SendContactInfoEmail - Event JSON: Empty
- Press “Save”
Press “Test” (again)
Verify the response
Response
{
"statusCode": 200,
"body": "\"Successfully sent email from Lambda using Amazon SES\""
}
Check your inbox (also check the spam directory)
- Use the “Test” feature in the Lambda console to ensure it returns the correct response.
Add DynamoDB as trigger for the SendContactInfoEmail lambda funtion
- Press “+ Add trigger” in the Function Overview Diagram
- Choose the DynamoDB service.
- DynamoDB table: Contacts
- Press Add
Verify
- Navigate to the AddContactInfo lambda function
- Use the “Test” feature in the Lambda console to ensure it returns the correct response.
- Press “Test”
- Check the entry in the DynamoDB table and that you also receive an email.
Step 4: Develop a Web Page with a Contact Form
Create an
index.htmlfile with the following content:index.html<!DOCTYPE html> <html> <head> <title>Contact Form</title> <!-- Add Bootstrap CSS --> <link rel="stylesheet" href="https://maxcdn.bootstrapcdn.com/bootstrap/4.5.0/css/bootstrap.min.css"> </head> <body> <div class="container"> <h1>Contact Form</h1> <form id="contactForm" method="POST"> <div class="form-group"> <label for="name">Name:</label> <input type="text" class="form-control" id="name" name="name" required> </div> <div class="form-group"> <label for="email">Email:</label> <input type="email" class="form-control" id="email" name="email" required> </div> <div class="form-group"> <label for="msg">Message:</label> <textarea class="form-control" id="msg" name="msg" rows="4" cols="50" required></textarea> </div> <input type="submit" class="btn btn-primary" value="Submit"> </form> </div> <!-- Add Bootstrap JS and jQuery --> <script src="https://code.jquery.com/jquery-3.5.1.slim.min.js"></script> <script src="https://cdn.jsdelivr.net/npm/bootstrap@4.5.0/dist/js/bootstrap.min.js"></script> <script> ApiUrl = "<API_ENDPOINT>"; // Add event listener to form. Intercept form submission document.getElementById("contactForm").addEventListener("submit", function(event) { event.preventDefault(); // Prevent form submission // Retrieve form data var formData = { name: document.getElementById("name").value, email: document.getElementById("email").value, msg: document.getElementById("msg").value }; // Convert JavaScript object to JSON string var payload = JSON.stringify(formData); // Send payload to the API (asynchronously) fetch(ApiUrl, { method: "POST", body: payload }) .then(response => { if (response.ok) { alert("Form submitted successfully"); } else { alert("Form submission failed"); } }) .catch(error => { console.error("An error occurred:", error); }); }); </script> </body> </html>Verify
- Use your web browser and go to
file://<path>/index.html - Check the record in DynamoDB
- Check that you received an email
- Use your web browser and go to
Step 5: Set Up S3 for Static Website Hosting
Create an S3 Bucket
- Navigate to the S3 service in the AWS Management Console.
- Click “Create bucket”
- Bucket name:
contacts<date><time>(The bucket name must be unique) - Click “Create bucket”
- Bucket name:
Upload the Web Page
- Upload the
index.htmlfile to your S3 bucket.
- Upload the
Enable Static Website Hosting
- Go to the properties tab
- Enable “Static website hosting” in the bucket properties.
- Index document:
index.html - Press “Save changes”
- Go to the Permissions tab
- Uncheck “Block public access” in the bucket permissions.
- Press “Save changes”
- Add Bucket Policy (Change the bucket name!)
{ "Version": "2012-10-17", "Statement": [ { "Sid": "PublicAccessGetObject", "Principal": "*", "Effect": "Allow", "Action": [ "s3:GetObject" ], "Resource": [ "arn:aws:s3:::<bucket_name>/*" ] } ] } - Press “Save changes”
- Go to the properties tab
Verify
- Access the bucket URL (provided in the static website hosting settings) to ensure your web page loads.
- Fill in the contact form and verify that the information is stored in DynamoDB and that you receive a notification email.
Step 6: Set Up a CodePipeline
Reference: https://docs.aws.amazon.com/codepipeline/latest/userguide/tutorials-s3deploy.html
Create a CodeCommit git repository
- Name:
ContactForm - Commit the index.html file to the repo
- Name:
Create CodePipeline
- Navigate to CodePipeline
- Pipeline name:
ContactPipeline - Next
- Pipeline name:
- Source
- Source provider: AWS CodeCommit
- Repository name: ContactPipeline
- Branch name: main
- Next
- Build
- Press Skip build stage
- Deploy
- Deploy provider: Amazon S3
- Bucket: contactform…
- Check Extract file before deploy (important!)
- Next
- Press Create pipeline
- Navigate to CodePipeline
Final Thoughts
This tutorial demonstrates a step-by-step approach to creating a serverless web application using AWS services. By following these steps, you should have a functional web app with a contact form that saves the contact info in a DynamoDB and sends a notification email.
Cleanup
Remove resources you no longer need to avoid unnecessary costs.
- S3
- Lambda functions
- API Gateway
- DynamoDB
- IAM Roles
- CodeCommit
- CodePipeline